Projects and products
Go code-diving
Have no fear!
Click the headlines below to learn about my projects and products through descriptions, program functionality examples, code examples and the possibility of reading and/or downloading the entire code.
Task
Evaluate and redesign the website www.bella6000.dk.
Solution
The solution consists of two things:
- The website bellaitaliaredesign.wordpress.com in which of all my thoughts regarding the evaluation and redesign are presented, i.e. described and illustrated.
- An Adobe XD-file containing the redesign.
Images
The homepage of the existing website
The upper part of the homepage of my prototype
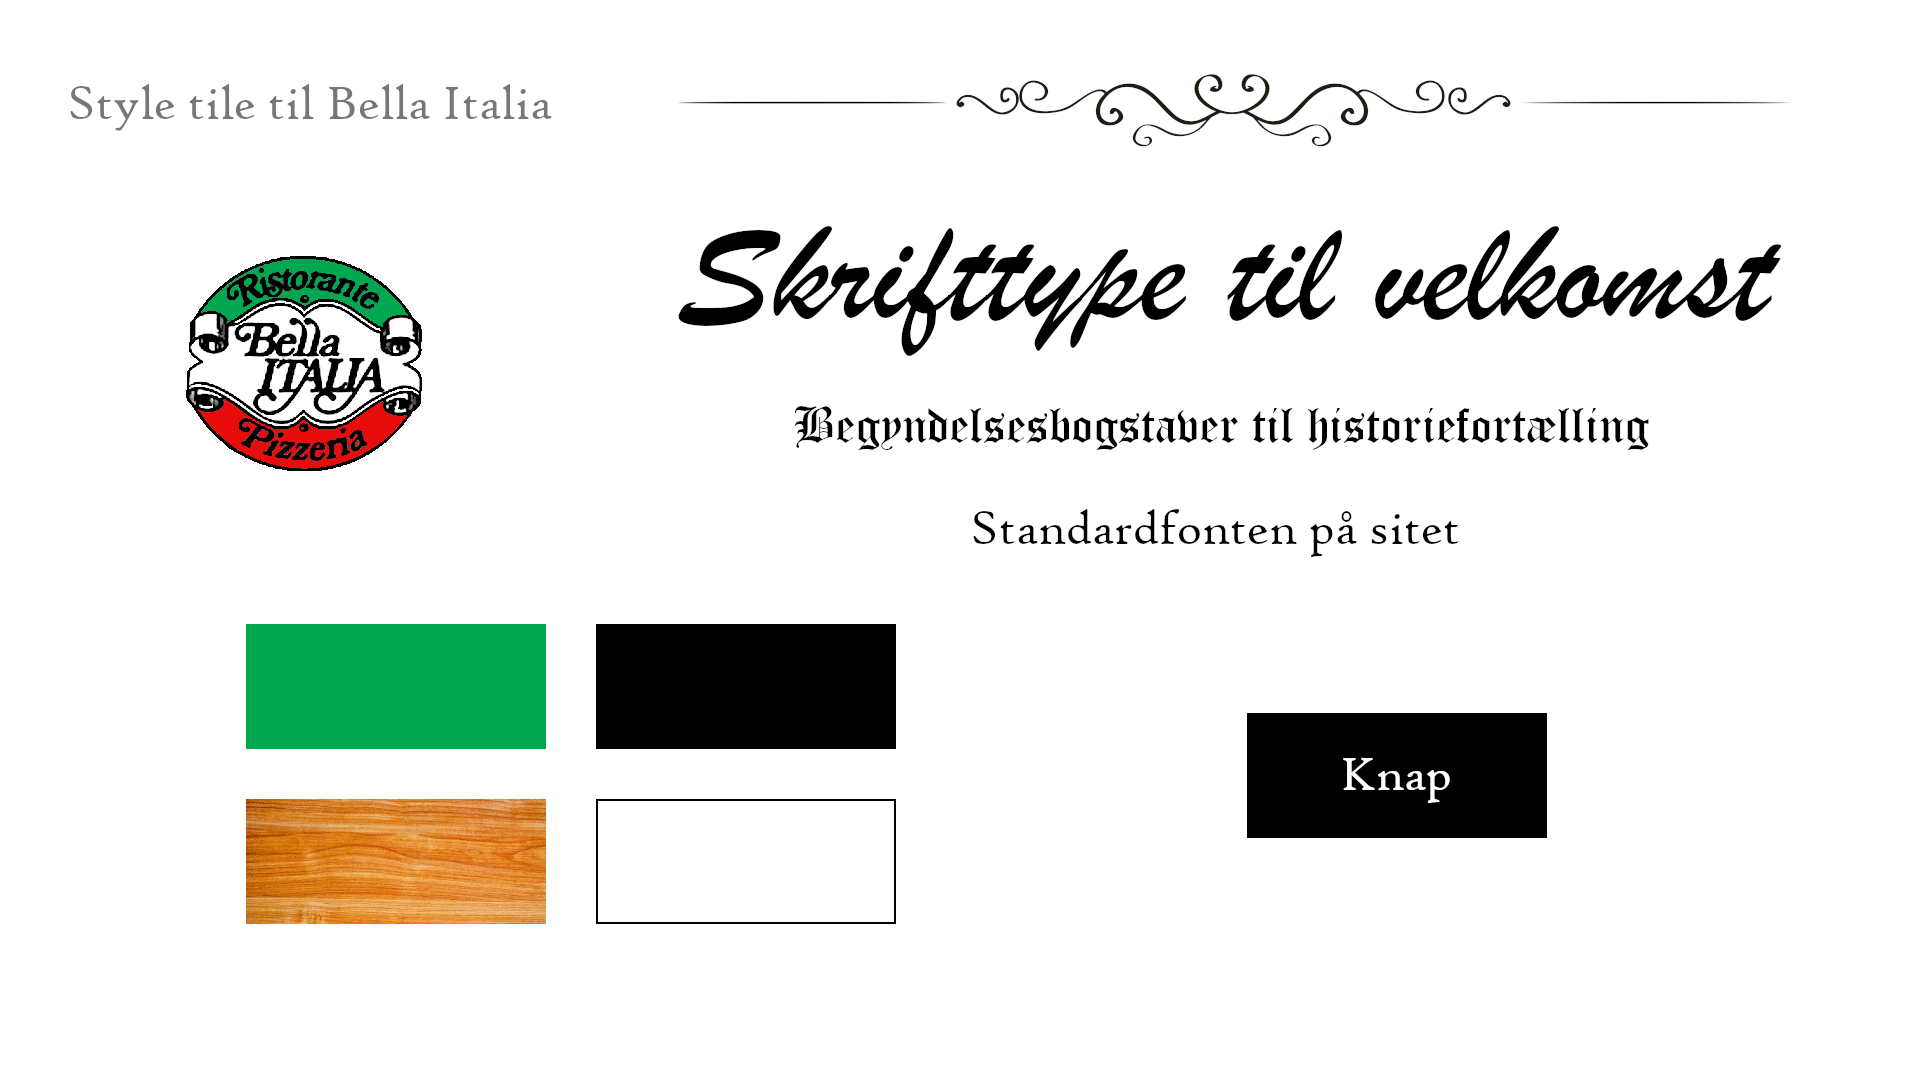
My style tile
Click this button to download all of the files:
Task
Make a webpage where you can choose many different dishes and then get a generated shopping list.
Solution
The page “Food” here on this website.
On the page, the user can select dishes and get the appropriate shopping list, get a random shopping list for certain dishes based on the users’ criteria, and finally the user can search dishes based on ingredient.
Emphasis in the development was on the user not having to ever start over selecting the different things. I succeeded in this making the whole thing one big form, where everything is sent every time. Thereby, the user doesn’t have start over at any time, and another great benefit is for example, that the search result remains visible while other data are changed, sent and received.
The PHP solution connects to a database (made by me), and I have taken the necessary means to avoid SQL injection attacks.
Click this button to go to the page:
Task
Investigate the usage and effects of Security Headers in Denmark and worldwide.
Solution
A report and a powerpoint presentation, both of which can be downloaded in the bottom.
The following overview of Security Headers’ functions and effects is part of my solution:
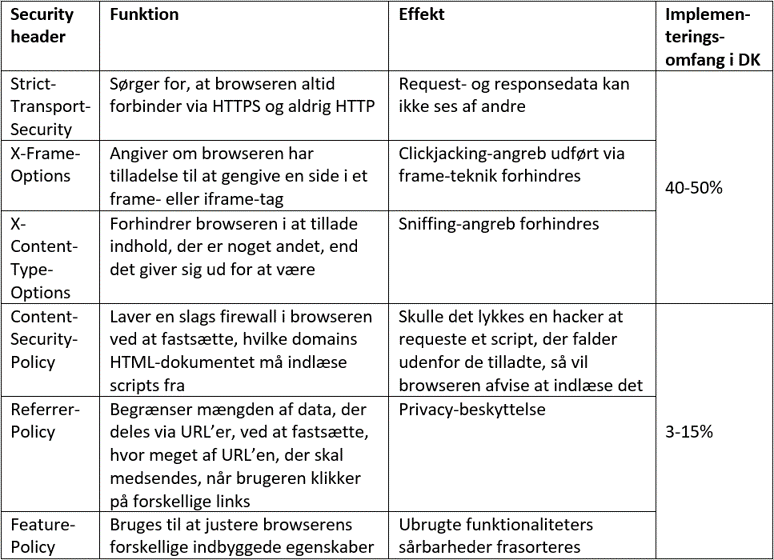
An overview of the functions and effects of 6 Security Headers
The conclusion is as follows:
Samlet set viser resultaterne af undersøgelserne, at arten og graden af den generelle SH-implementering er særdeles mangelfuld.
Den generelle hjemmesidebruger kan på ingen måde regne med at være beskyttet af SH på selv de mest populære hjemmesider, hvad end det drejer sig om banker, nyhedsmedier eller de allerstørste virksomheder.
Behovet for IT-sikkerhed, det vil sige brugerbeskyttelse i forbindelse med hjemmesidebesøg i denne sammenhæng, er vokset i takt med internettet, datastrømmen og antallet af forbindelser, men behovet er altså langt fra dækket i øjeblikket, og den generelle online-sikkerhed lider voldsomt derunder.
Den generelle bruger er sig slet ikke Security headers, deres funktioner og farerne ved deres fravær bevidst, så det er et stort problem og udtryk for uansvarlighed, når langt størstedelen af hjemmesideindehavere ikke benytter sig af en generelt set så lettilgængelig brugerbeskyttende mekanisme, som Security headers udgør.
Click this button to download all of the files:
Task
Within the concepts and approaches of Unified Process, investigate and describe what people, considerations, events and diagrams would be relevant to make part of the process of transforming the board game “Flamme Rouge” into a computer game.
Solution
A powerpoint presentation, which among other things contains the following:
- Description of Unified Process
- Design Thinking
- Vision
- Use Case Model (containing examples of brief, casual and fully dressed use cases)
- Business Process Model (Flowchart Diagram)
- Iteration Plan
- Evaluation (of Inception)
- Domain Model
- Design Model
- Implementation of Start Up Use Case
- Evaluation (of Elaboration)
Click this button to download all of the files:
Task
Transform the board game “Flamme Rouge” into a computer game.
Solution
The board game has been digitalized using Visual Studio and C#, and among the most prolific ingredients are:
- Inheritance
- Interface (class)
- Design Patterns: Singleton, Prototype
- Database connection for storing and retrieving game results
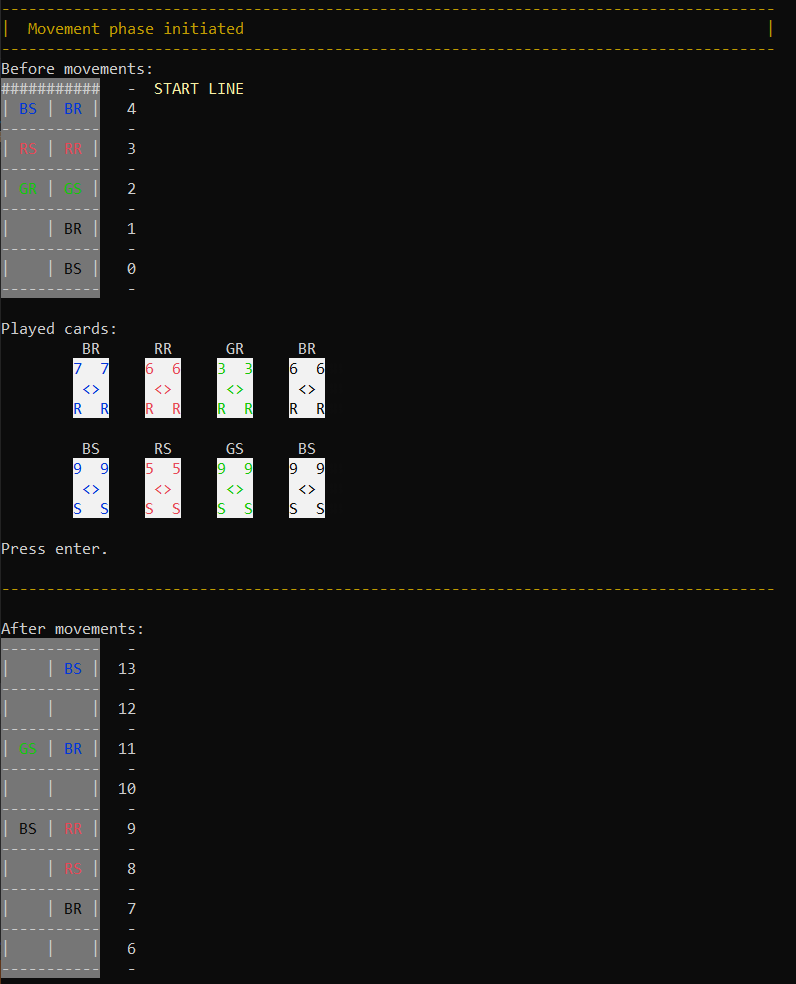
A lot of colors are used in the console to depict cards, riders and the course
The solution is part of an exam I did in a course called Advanced Programming. I solved 3 other tasks as well in that exam, so those are also be part of the files for download below. To solve the other tasks I used Dijkstra, Graph Theory, Depth First Search, Breadth First Search among other things, which is all very interesting stuff!
It’s all described in the report and partly in the code. (All of the code is in the report).
Click this button to download all of the files:
Task
Make a website, where I present my projects, products and learning progress in detail.
Solution
The website you are currently visiting.
Three months ago I had no knowledge at all about the subject. I then followed the course Beginner Full Stack Web Development: HTML, CSS, React & Node (30 hrs) on Udemy and made this website. Through HTML5, CSS3 and JavaScript, I have used the following elements/techniques:
- Google fonts
- Jumbotron
- Font awesome
- Progressive images
- Image-transformation
- CSS Grid
- Window width responsivity
- Navbar
- Bootstrap 4: Accordion, Carousel, Modal, Rows and columns
- JavaScript: Image-slideshow
Do feel free to look around!
Click the buttons below to watch the HTML files, CSS files and Javascript files in their complete form (as they were in June 2019):
Click this button to download all of the files (as they were in June 2019):
Task
Design, normalize and implement a database for a small publisher, and then extract data from it.
Solution
The design of the database can be seen from the relation diagram below:

The table ‘boggenretildeling’ seemingly has no primary key, but actually its two fields together take on that role
The database shown is in the 3rd normal form.
The implementation of the database and the extraction of data from it is done through an SQL-script. Here is an extract from the script, where the table ‘byer’ is created:
CREATE TABLE postnumre
(postnummer CHAR(4) NOT NULL PRIMARY KEY,
bynavn VARCHAR(30) NOT NULL,
CONSTRAINT ligegyldigt_postnummer_check CHECK
(LENGTH(postnummer) = 4)
);
The wish to make sure that ‘postnummer’-entries consist of exactly four characters is not fulfilled by the constraint in MySQL (which is the program I used for this database), and therefore a stored procedure, a before insert trigger and a before update trigger are created:
DELIMITER $
CREATE PROCEDURE postnummer_check(IN postnummer CHAR(4))
BEGIN
IF LENGTH(postnummer) <> 4 THEN
SIGNAL SQLSTATE '45000'
SET MESSAGE_TEXT = 'postnumre.postnummer skal bestå af præcis 4 cifre';
END IF;
END$
DELIMITER ;
DELIMITER $
CREATE TRIGGER postnumre_before_insert BEFORE INSERT ON postnumre
FOR EACH ROW
BEGIN
CALL postnummer_check(new.postnummer);
END$
DELIMITER ;
DELIMITER $
CREATE TRIGGER postnumre_before_update BEFORE UPDATE ON postnumre
FOR EACH ROW
BEGIN
CALL postnummer_check(new.postnummer);
END$
DELIMITER ;
After constructing all of the tables, they are filled with data, from which a lot of new data is then extracted using a variety of queries.
Click the button below to watch the sql-script in its complete form:
Click this button to download the sql-script:
Task
Make a small administrative system for a public library containing different material classes and having a GUI part. It should at least give the user the possibility of getting a list of all materials, of searching for, borrowing and returning a certain material, and various warnings about impossibilities should pop up.
Solution
At the core of the program we have the superclass ‘materiale’ and its four different subclasses, ‘bog’, ‘film’, ‘LP’ and ‘spil’ that all inherit from ‘materiale’. Their attributes are used by the GUI to let the user do what was asked for in the task description. Several other functionalities exist however, among these are:
- Delete material
- Reserve material
- Create new material (with a lot of parameter checking going on)
- Save current state, i.e. binary saving of the objects in an external file
- Recreate the original database of materials
Below you see screen shots of the program in action:
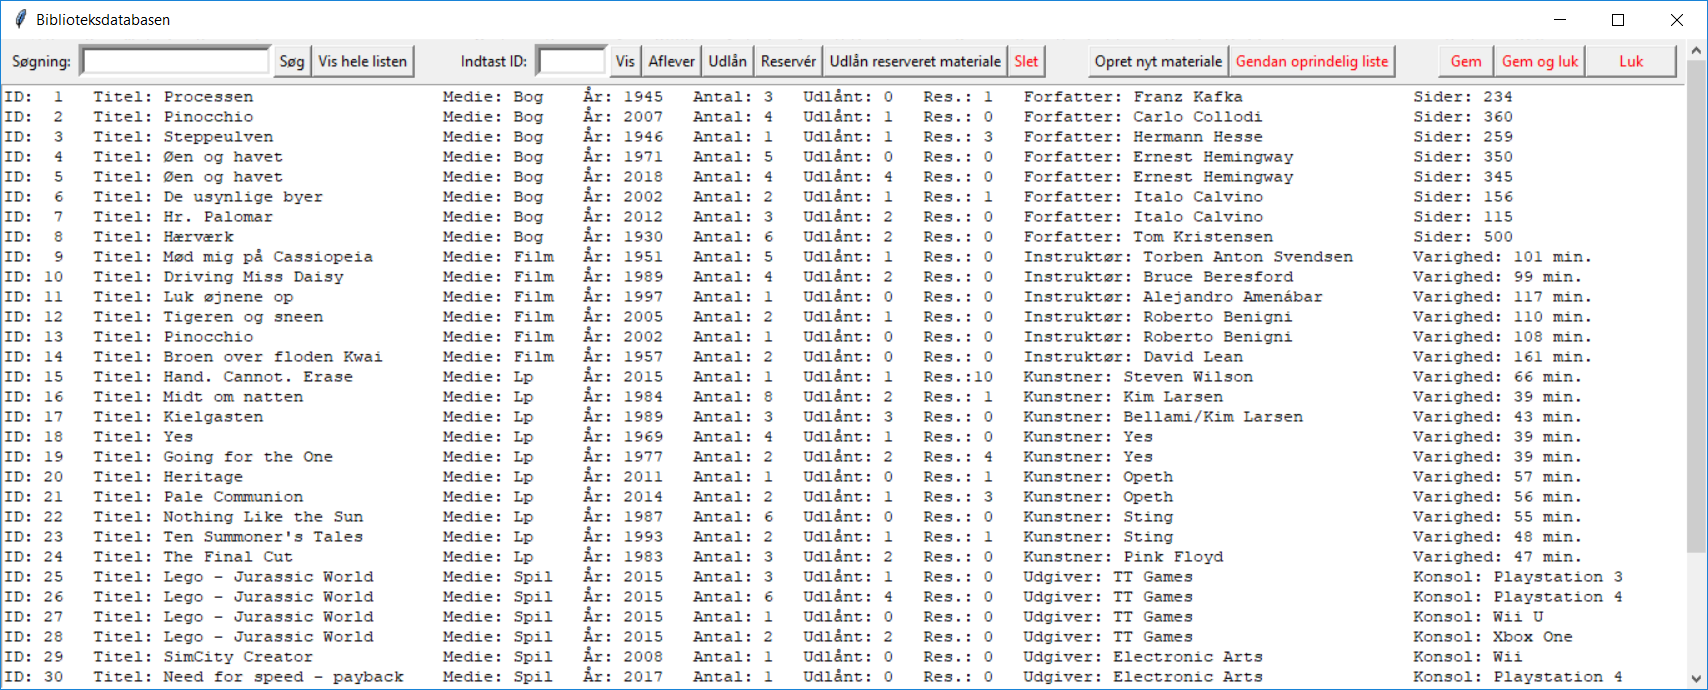
The complete list of materials is shown
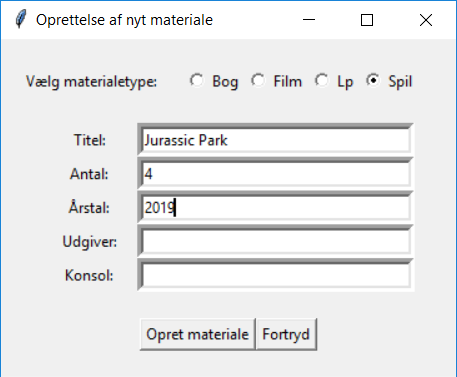
A new material is being created

The material with ID=15 can't be borrowed. Would you like to reserve it?

The search function relates to both the title, year, artist/company and console
The most interesting and maybe even cool thing about the program might be its use of binary saving. It is done using the module ‘pickle’, and the save performing functions are all in the file ‘data_bevaring.py’, which - along with all of the other files - can be seen in its complete form by clicking the buttons in the bottom. The following extracts show how the ‘materialeliste’, i.e. a list containing material objects, is saved and loaded:
def gem_materialeliste(materialeliste):
with open(filnavn, "wb") as gm:
pickle.dump(materialeliste, gm, pickle.HIGHEST_PROTOCOL)
The function ‘gem_materialeliste’ takes a list as its parameter, which is then saved (dumped) in the binary file entitled ‘filnavn’ at the location where the .py-file of the programming running is located.
def hent_gemt_materialeliste():
with open(filnavn, "rb") as gm:
gemt_materialeliste = pickle.load(gm)
return gemt_materialeliste
The function ‘hent_gemt_materialeliste’ first loads and then returns the list entitled ‘filnavn’ at the location where the .py-file of the programming running is located.
Let’s also take a look at the constructor of the superclass ‘Materiale’:
class Materiale:
def __init__(self, idnr=0, titel="N/A", antal=0, antal_udlaan=0,
reservationer=0, aarstal=0):
self.idnr = idnr
self.titel = titel
self.antal = antal
self.antal_udlaan = antal_udlaan
self.reservationer = reservationer
self.aarstal = aarstal
self.medie = "?"
No object is ever made from this class. It serves instead entirely as a superclass on the base of which e.g. objects of the subclass ‘Bog’ are created:
class Bog(Materiale):
def __init__(self, idnr=0, titel="N/A", antal=0, antal_udlaan=0,
reservationer=0, aarstal=0, forfatter="N/A", antal_sider=0):
super(Bog, self).__init__(idnr, titel, antal, antal_udlaan,
reservationer, aarstal)
self.forfatter = forfatter
self.antal_sider = antal_sider
self.medie = "Bog"
Click the buttons below to watch the python files in their complete form:
Click this button to download all of the files:
Task
Make a small computer game, where the player tries to get out of a mine field alive.
Solution
Beyond solving the task, the following extra elements were put into the game as well (the code relating to the parts in bold will be shown and explained below):
- Player login (through player name)
- Player logout
- Topscorer list (saved as a list in a separate json-file, which the program itself creates when needed)
- Introduction to the game within the game
- An introductory game
- 3 levels (comprising several different randomized bomb-patterns)
- Dimensions of the mine field totally up to the player with no upper limit (the level-based and randomized pattern is then layed out within the chosen dimensions)
- Point system based on the level and dimensions of the field
Here, you see screen shots of the main menu and the ingame game introduction:
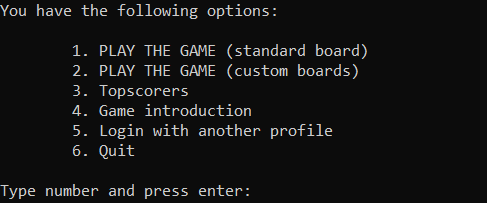
Main menu
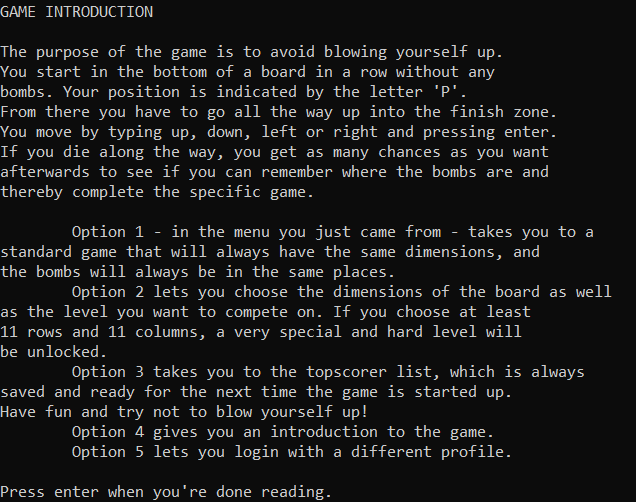
Ingame game introduction
Here, you see a player making a custom board and then trying to make it out alive:

The player is making a custom board

Let the game begin! The player is marked by 'P'

First steps
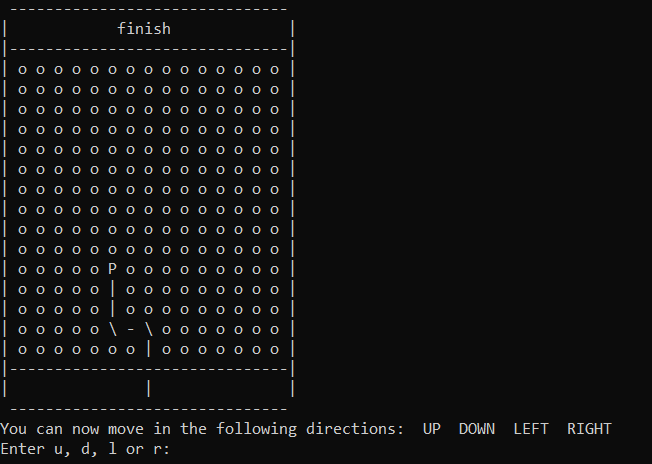
Now don't you blow up on me! (Game title)

Now that's a shame :-(
Now it’s time for some in-depth explaining of the code.
When the program is started, the following piece of code takes care of the course of events. First of all, the topscorer list is loaded and put into a variable, and then the player is greeted and put into a variable as well.
After those few startup functions and variables have been dealt with, a while-loop is started and runs until the program is stopped by the user. The while-loop always starts with printing the main menu, and the user’s choice (‘actual_choice’) then decides where to go next. Whenever the process there is finished, the while-loop runs again from the top, unless of course the user chooses to exit the program.
"""
THE PROGRAM IS STARTED HERE
"""
# Initiation of topscorer list and start screen
actual_topscorer_list = load_topscorer_list()
start_screen()
# Player registration and personal welcome
unchecked_player = enter_name_return_player_list()
welcome_back = player_list_update(unchecked_player, actual_topscorer_list)
actual_player = unchecked_player
welcome(actual_player, welcome_back)
# Main menu is printed and returned to until game is closed
while True:
print_main_menu_options()
actual_choice = choose_main_menu_option_return_int_choice()
if actual_choice == 1:
points_scored = start_game([5, 3, 0])
if points_scored != 0:
add_player_points(actual_player, points_scored)
topscorer_list_update(actual_player, actual_topscorer_list)
save_topscorer_list(actual_topscorer_list)
elif actual_choice == 2:
start_game_list = prepare_start_game_return_start_game_list()
points_scored = start_game(start_game_list)
if points_scored != 0:
add_player_points(actual_player, points_scored)
topscorer_list_update(actual_player, actual_topscorer_list)
save_topscorer_list(actual_topscorer_list)
elif actual_choice == 3:
print_topscorer_list(actual_topscorer_list)
elif actual_choice == 4:
game_introduction()
elif actual_choice == 5:
unchecked_player = enter_name_return_player_list()
welcome_back = player_list_update(unchecked_player,
actual_topscorer_list)
actual_player = unchecked_player
welcome(actual_player, welcome_back)
elif actual_choice == 6:
exit_game(actual_player)
else:
print("Something went wrong in the main menu")
The most interesting parts of the code comes into play when the player decides to actually play the game. At that point, the player chooses ‘1’ (standard board) or ‘2’ (custom board) in the main menu. As can be seen in the code above, the ‘actual_choice’ is then ‘1’ or ‘2’, both of which in turn calls the function ‘start_game()’. That function takes a list as its parameter, and let’s now have a look at how that list is put together when the custom board is chosen. Firstly, the function ‘prepare_start_game_return_start_game_list()’ is called:
# GAME FUNCTIONS (1 & 2 IN MAIN MENU)
def prepare_start_game_return_start_game_list():
"""Returns list of chosen options [rows, columns, level]"""
while True:
rows = input("\nHow many rows do you want? ")
columns = input("How many columns do you want? ")
try:
rows = int(rows)
columns = int(columns)
except ValueError:
print("You didn't type in whole numbers. Try again.")
continue
else:
if not (rows >= 4 and columns >= 4):
print("You have to choose at least 4 rows and 4 columns. "
"Try again.")
continue
break
possible_levels = []
if rows >= 4 and columns >= 4: # necessarily true
possible_levels.append(1)
if rows >= 6 and columns >= 6:
possible_levels.append(2)
if rows >= 11 and columns >= 11:
possible_levels.append(3)
print("\nThe following levels are available:")
for number in possible_levels:
print("\tLevel " + str(number))
while True:
choose_level = input("\nType the number of the level you "
"want to try: ")
try:
level_choice = int(choose_level)
except ValueError:
print("You didn't type in a whole number. Try again.")
continue
else:
if level_choice in possible_levels:
break
else:
print("You didn't type in one of the numbers. Try again.")
return [rows, columns, level_choice]
After making sure the player is typing in whole numbers greater than ‘3’, levels represented by numbers are appended to an empty list, which the player then is told to choose from. In the end, a list containing the number of rows and columns and the chosen level is returned.
The list returned from the function ‘prepare_start_game_return_start_game_list()’ is then passed on as an argument into ‘start_game()’, which starts like this:
def start_game(start_game_list):
"""Accepts a list containing [rows, columns, level_choice]
and starts the game"""
rows = start_game_list[0]
columns = start_game_list[1]
level = start_game_list[2]
start_again = True
while start_again:
original_game = GameEngine(rows, columns)
The elements of the argument (a list) are put into variables, and then GameEngine() is called, which makes a grid (a board) without any bombs:
import copy
import random
class GameEngine():
"""
Instantiation of a point grid with rows and columns,
where each point is shown as 'o' and has no bomb.
An extra row is added in the end, where each point
is shown as ' ' and has no bomb. Those points are for
the starting zone.
The coordinates are structured like this:
(0,0) (0,1) (0,2)
(1,0) (1,1) (1,2)
(2,0) (2,1) (2,2)
"""
def __init__(self, rows, columns):
self.rows = rows
self.columns = columns
self.row = [] # the grid
self.grid = [] # the grid
self.dictionary = {'show': 'o', 'bomb': False} # the grid
self.start_row = [] # start zone
self.start_dictionary = {'show': ' ', 'bomb': False} # start zone
for x in range(columns): # the grid
self.row.append(copy.deepcopy(self.dictionary))
for y in range(rows): # the grid
self.grid.append(copy.deepcopy(self.row))
for z in range(columns): # start zone
self.start_row.append(copy.deepcopy(self.start_dictionary))
self.grid.append(copy.deepcopy(self.start_row))
The constructor of the class ‘GameEngine’ creates a 2-dimensional grid with each coordinate containing a dictionary, that contains low level graphics and bomb information.
What happens next in ‘start_game()’ is some randomized bomb pattern selection based on the chosen level, which is then layed out over the previously created grid. The laying out of bombs happens in the GameEngine-class. Here is an example:
# Minimum size grid: 6 rows x 6 columns
def pattern_four(self):
for row in range(self.rows):
if (row + 6) % 6 == 0:
for column in range(self.columns):
if (column + 6) % 6 == 0:
self.put_bomb(row, column)
if (column + 5) % 6 == 0:
self.put_bomb(row, column)
if (column + 4) % 6 == 0:
self.put_bomb(row, column)
if (column + 1) % 6 == 0:
self.put_bomb(row, column)
elif (row + 5) % 6 == 0:
six_positions_counter = 0
for six_column_positions in range(self.columns // 6):
random_position = random.randint(0, 5)
self.put_bomb(row, six_positions_counter * 6 +
random_position)
six_positions_counter += 1
if self.columns % 6 != 0:
rest_positions = self.columns % 6
random_position = random.randint(0, rest_positions - 1)
self.put_bomb(row, six_positions_counter * 6 +
random_position)
elif (row + 4) % 6 == 0:
for column in range(self.columns):
if (column + 5) % 6 == 0:
self.put_bomb(row, column)
if (column + 4) % 6 == 0:
self.put_bomb(row, column)
if (column + 1) % 6 == 0:
self.put_bomb(row, column)
elif (row + 3) % 6 == 0:
for column in range(self.columns):
if (column + 2) % 6 == 0:
self.put_bomb(row, column)
if (column + 1) % 6 == 0:
self.put_bomb(row, column)
elif (row + 2) % 6 == 0:
for column in range(self.columns):
if (column + 6) % 6 == 0:
self.put_bomb(row, column)
if (column + 5) % 6 == 0:
self.put_bomb(row, column)
if (column + 2) % 6 == 0:
self.put_bomb(row, column)
elif (row + 1) % 6 == 0:
for column in range(self.columns):
if (column + 3) % 6 == 0:
self.put_bomb(row, column)
else:
print("Something went very wrong in the bomb placements")
The hardest part about writing the code for the patterns related to going all the way to the edge but at the same time avoiding to grab a coordinate that doesn’t exist.
Then the player is given start coordinates, the board including the player is drawn (written :-)) graphically, and the player is given the possible directions to take. The game now starts, and for each move, the eventuality of the player being home free is checked, the existence of a bomb at the new place is checked, the board including the path of the player is drawn in its new state, and new possible directions are given.
I don’t know how many people will get to this point in my explanation, so thank you so very, very much for giving meaning to my work :-)
Click the buttons below to watch the python files in their complete form:
Click this button to download all of the files and PLAY THE GAME:
Task
Make objects that represent a deck of cards and two players, and make them play the card game “War” against each other.
Solution
As the other projects presented on this site, also this one was made with the purpose of learning how to code. However, this project is a very early work and must be assessed with that in mind.
The solution consists of four .java-files, each containing a class that takes on a particular role:
- “class Player”: A player object has a name and holds cards. Through different functions, a player can have cards looked upon, taken away and given.
- “class Card”: A card object has a suit and a value. A card comprises a function that returns its value.
- “class CollectionOfCards”: An object made from this class is an ArrayList holding card objects. Through different functions, such a collection of cards can be mixed randomly, its first card can be fetched and then looked upon through the card’s own function, and it can have cards being removed from it and given to it.
- “class CardGames”: This class is not used to create objects, instead this is simply the place where the player objects, card objects, collection objects and the game itself is created, set into motion and eventually finishes.
Below you see the entire code in ‘CardGames.java’.
Beforehand let me just tell you the rules of the game “War”: First, all of the 52 cards are handed out to the two players, each holding their cards in a pile. Then the game starts by the players showing each other their top card, and the player with the highest value takes both cards and puts them in the bottom of his/her stack of cards. If the values are equal, each player put three more cards into the pool, and the player’s fifth cards are compared to settle who take all the cards in the pool. If other equalities in value should occur, the previous procedure is repeated. In the end, one of the players holds all cards and thereby won the game.
Now for the code of ‘CardGames.java’:
import java.util.ArrayList;
public class CardGames {
public static void main(String[] args) {
//To spillere oprettes
Player john = new Player("John");
Player bruce = new Player("Bruce");
//Kort oprettes og lægges i bunkens kortholder-array
ArrayList<Card> bunkensKortholder = new ArrayList<Card>();
for (int værdiTal = 2; værdiTal <= 14; værdiTal++) {
Card nytKorth = new Card('h',værdiTal);
bunkensKortholder.add(nytKorth);
Card nytKortr = new Card('r',værdiTal);
bunkensKortholder.add(nytKortr);
Card nytKortk = new Card('k',værdiTal);
bunkensKortholder.add(nytKortk);
Card nytKorts = new Card('s',værdiTal);
bunkensKortholder.add(nytKorts);
}
//Kortholder-array'et lægges ind i bunke-objektet
CollectionOfCards bunken = new CollectionOfCards(bunkensKortholder);
//Kortene blandes og fordeles til de to spillere
bunken.blandKort();
System.out.println("Kort fordeles til de to spillere.");
int kortOprindeligtIBunken = bunken.antalKort();
for (int x = 0; x < kortOprindeligtIBunken / 2; x++) {
john.fåKort(bunken.seØversteKort());
bunken.udØversteKort();
bruce.fåKort(bunken.seØversteKort());
bunken.udØversteKort();
}
//Spillet går i gang
System.out.println("Spillet går i gang.");
int rundetæller = 1;
while (john.antalSpillerKort() != 0 && bruce.antalSpillerKort() != 0) {
System.out.println("Runde " + rundetæller++);
int A = john.seSpillerKort(0).fåVærdi();
int B = bruce.seSpillerKort(0).fåVærdi();
if (A > B) {
john.fåKort(bruce.seSpillerKort(0));
bruce.givKort(bruce.seSpillerKort(0));
while (bunken.antalKort() > 0) {
john.fåKort(bunken.seØversteKort());
bunken.udKort(bunken.seØversteKort());
}
}
else if (A < B) {
bruce.fåKort(john.seSpillerKort(0));
john.givKort(john.seSpillerKort(0));
while (bunken.antalKort() > 0) {
bruce.fåKort(bunken.seØversteKort());
bunken.udKort(bunken.seØversteKort());
}
}
else {
if (bruce.antalSpillerKort() > 4 && john.antalSpillerKort() > 4) {
for (int x = 0; x < 4; x++) {
bunken.indKort(bruce.seSpillerKort(0));
bruce.givKort(bruce.seSpillerKort(0));
bunken.indKort(john.seSpillerKort(0));
john.givKort(john.seSpillerKort(0));
}
}
else if (bruce.antalSpillerKort() > john.antalSpillerKort()) {
while (john.antalSpillerKort() > 0) {
bruce.fåKort(john.seSpillerKort(0));
john.givKort(john.seSpillerKort(0));
}
}
else {
while (bruce.antalSpillerKort() > 0) {
john.fåKort(bruce.seSpillerKort(0));
bruce.givKort(bruce.seSpillerKort(0));
}
}
rundetæller--;
}
}
//Vinderen findes og spillet afsluttes
String vinder;
if (john.antalSpillerKort() != 0) vinder = john.fåNavn();
else if (bruce.antalSpillerKort() != 0) vinder = bruce.fåNavn();
else vinder = "IKKE FUNDET!!! AAAAHHHHH!!!";
System.out.println("Vinderen er " + vinder);
}
}
Obviously, John is a better player than Bruce:
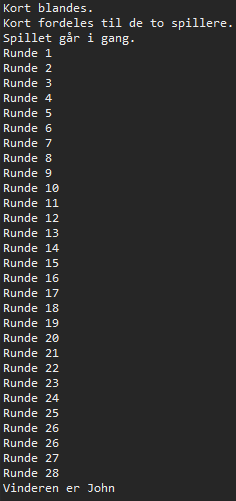
He does it!

He does it again!
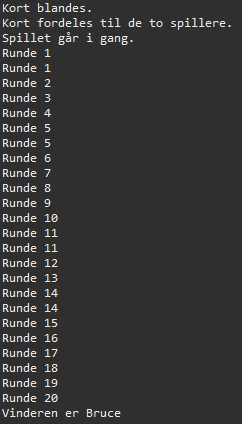
Of course also an idiot can win in this game...
Click the buttons below to watch the java files in their complete form:
Click this button to download all of the files and PLAY THE GAME:
Task
Build and program a LEGO machine that can sort bricks based on their color.
Solution
The build: A LEGO machine consisting of two conveier belts with individual motors, the outer conveier belt turnable through a third motor, and consisting of an object sensor and a color sensor.
The program: A program made in the LEGO MINDSTORM GUI that first of all makes the conveier belts move. This is temporarily stopped, when the object sensor detects a degree of object covering that suggests, that more than one brick is there. At that point, the conveier belts move taking turns in very short intervals, the outer one moving more each time which eventually increases the distance between the sensed bricks. After that, the conveier belts again move as in the beginning, which is also temporarily stopped, whenever the color sensor senses a color between yellow, red, blue or a color different from those three. At that point, the third motor is instructed to position the outer conveier belt over one of four sorting boxes, and then the outer conveier belt’s motor makes the brick go into the appropriate box.
Below you'll find:
- a video of the machine and program in action
- fotos of the machine
- a graphical representation of the program
Video
Fotos
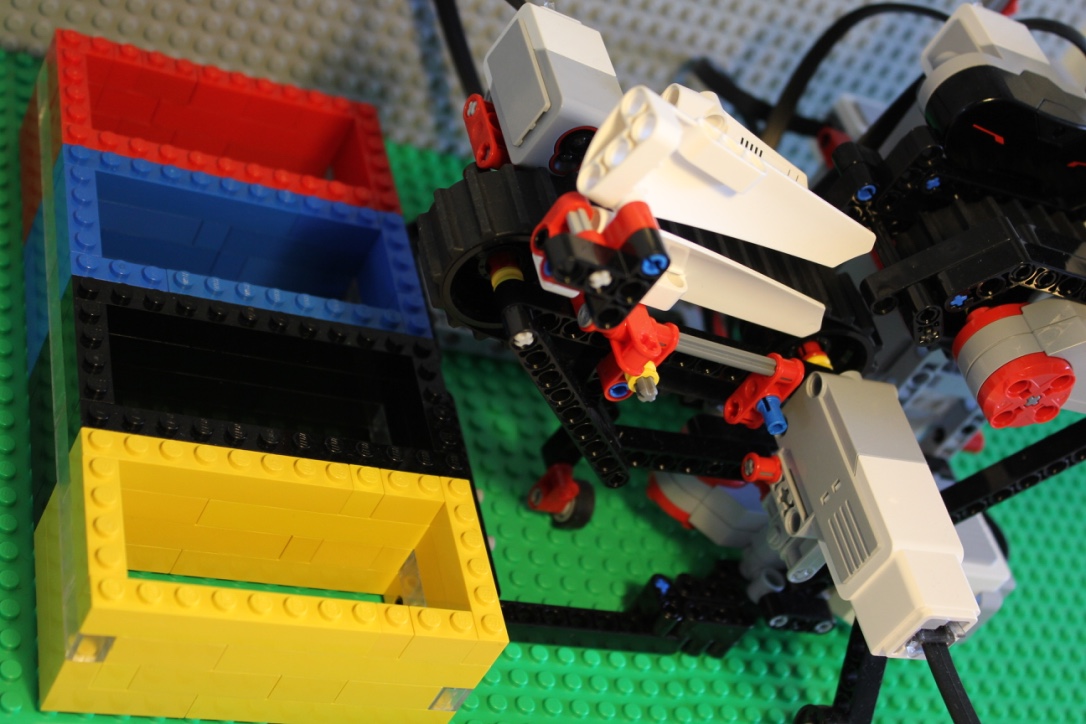
Outer conveier belt motor in the bottom right, color sensor in the top, and sorting boxes on the left

In the back: Brick-input

The brick is prevented from laying on one of its four sides before getting onto the inner conveyor belt

Outer conveyor belt with color sensor

From above
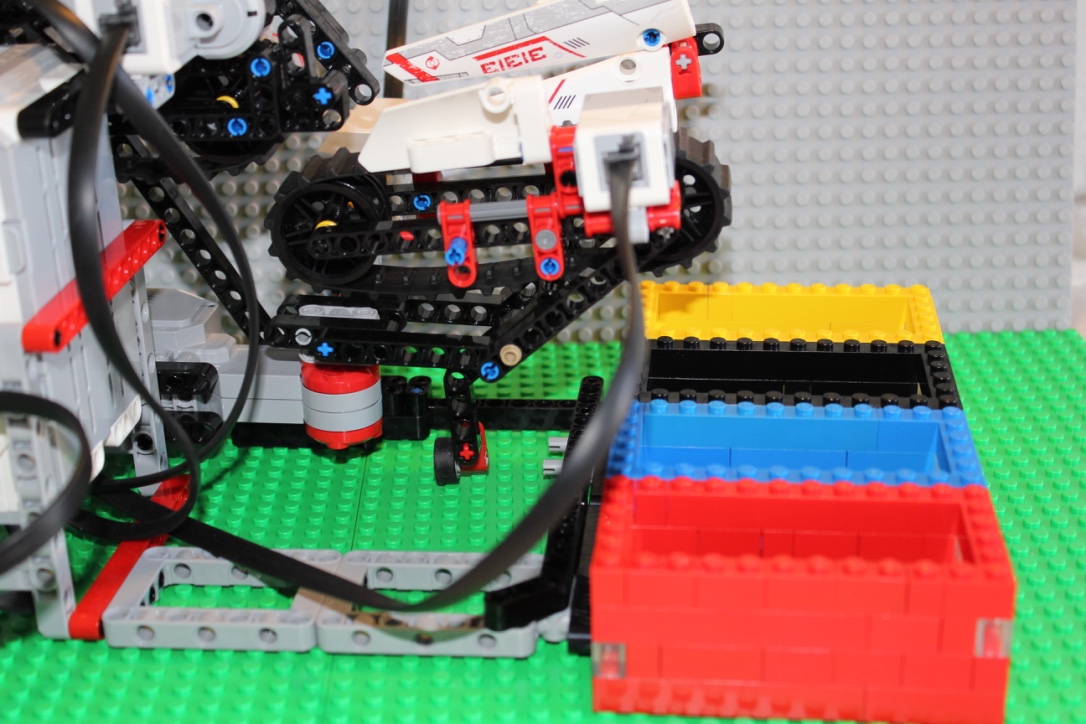
From the side: The motor in the bottom turns the outer conveyor belt
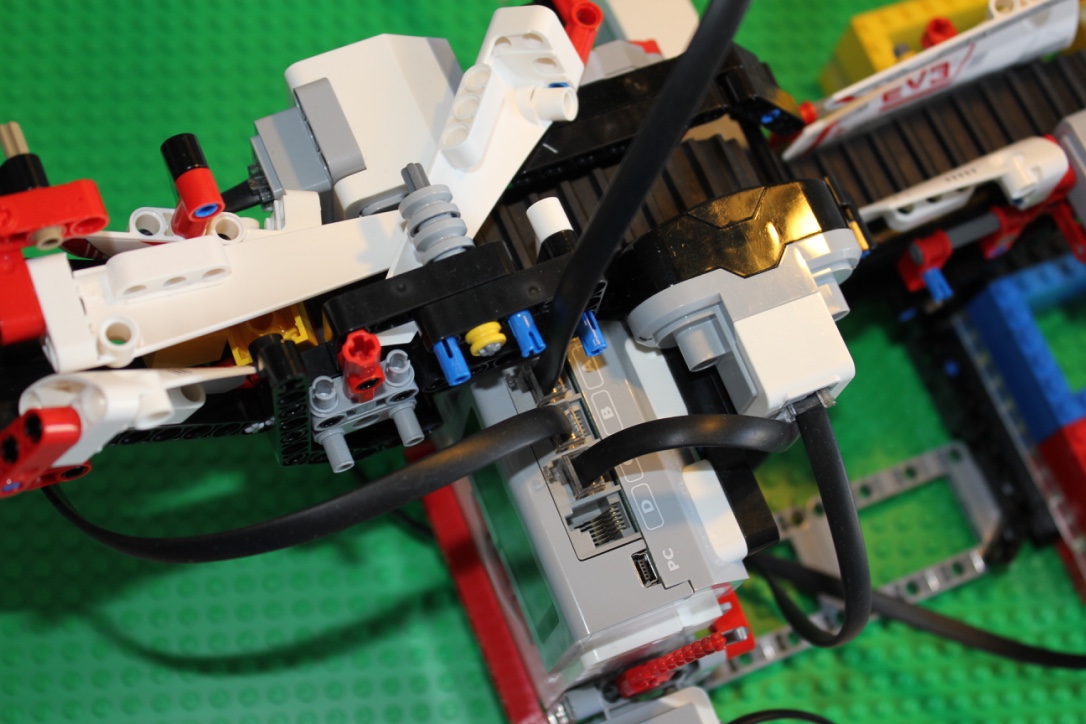
Top-down: The sensor that controls traffic and the programmable brick
Graphical representation of the program

The program as constructed in the LEGO MINDSTORMS GUI